深入理解 AuthenticationManagerBuilder 【源码篇】

咱们继续来撸 Spring Security 源码。

前面和大家分享了 SecurityBuilder 以及它的一个重要实现 HttpSecurity,在 SecurityBuilder 的实现类里边,还有一个重要的分支,那就是 AuthenticationManagerBuilder,AuthenticationManagerBuilder 看名字就知道是用来构建 AuthenticationManager 的,所以今天我们就来看一看 AuthenticationManager 到底是怎么构建的。

1.初步理解

在 Spring Security 中,用来处理身份认证的类是 AuthenticationManager,我们也称之为认证管理器。

AuthenticationManager 中规范了 Spring Security 的过滤器要如何执行身份认证,并在身份认证成功后返回一个经过认证的 Authentication 对象。AuthenticationManager 是一个接口,我们可以自定义它的实现,但是通常我们使用更多的是系统提供的 ProviderManager。

1.1 ProviderManager

ProviderManager 是的最常用的 AuthenticationManager 实现类。

ProviderManager 管理了一个 AuthenticationProvider 列表,每个 AuthenticationProvider 都是一个认证器,不同的 AuthenticationProvider 用来处理不同的 Authentication 对象的认证。一次完整的身份认证流程可能会经过多个 AuthenticationProvider。

ProviderManager 相当于代理了多个 AuthenticationProvider,他们的关系如下图:

1.2 AuthenticationProvider

AuthenticationProvider 定义了 Spring Security 中的验证逻辑,我们来看下 AuthenticationProvider 的定义:

1
2
3
4
5
public interface AuthenticationProvider {
Authentication authenticate(Authentication authentication)
throws AuthenticationException;
boolean supports(Class<?> authentication);
}

可以看到,AuthenticationProvider 中就两个方法:

  • authenticate 方法用来做验证,就是验证用户身份。
  • supports 则用来判断当前的 AuthenticationProvider 是否支持对应的 Authentication。

在一次完整的认证中,可能包含多个 AuthenticationProvider,而这多个 AuthenticationProvider 则由 ProviderManager 进行统一管理,具体可以参考松哥之前的文章:松哥手把手带你捋一遍 Spring Security 登录流程

最常用的 AuthenticationProvider 实现类是 DaoAuthenticationProvider。

1.3 Parent

每一个 ProviderManager 管理多个 AuthenticationProvider,同时每一个 ProviderManager 都可以配置一个 parent,如果当前的 ProviderManager 中认证失败了,还可以去它的 parent 中继续执行认证,所谓的 parent 实例,一般也是 ProviderManager,也就是 ProviderManager 的 parent 还是 ProviderManager。可以参考如下架构图:

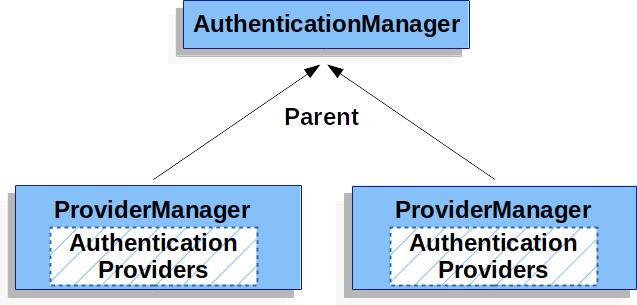
从上面的分析中大家可以看出,AuthenticationManager 的初始化会分为两块,一个全局的 AuthenticationManager,也就是 parent,另一个则是局部的 AuthenticationManager。先给大家一个结论,一个系统中,我们可以配置多个 HttpSecurity(参见Spring Security 竟然可以同时存在多个过滤器链?),而每一个 HttpSecurity 都有一个对应的 AuthenticationManager 实例(局部 AuthenticationManager),这些局部的 AuthenticationManager 实例都有一个共同的 parent,那就是全局的 AuthenticationManager。

接下来,我们通过源码分析来验证我们上面的结论。

本文内容和上篇文章紧密相关,如果大家还没看过上篇源码分析文章,一定点击超链接先看下。

2.源码分析

在上篇文章中,松哥已经和大家分析了 SecurityBuilder 的几个常见实现类 AbstractSecurityBuilder、AbstractConfiguredSecurityBuilder、HttpSecurityBuilder,本文关于这几个类我就不重复介绍了。

我们直接来看 AuthenticationManagerBuilder,先来看它的一个继承关系:

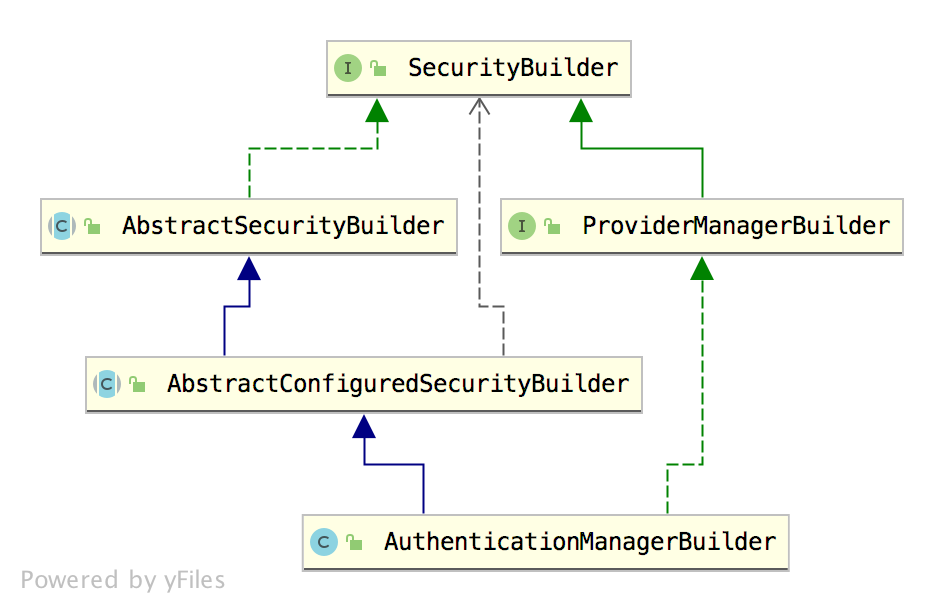
可以看到,【上篇文章】中介绍的全部都是 AuthenticationManagerBuilder 的父类,所以 AuthenticationManagerBuilder 已经自动具备了其父类的功能。

AuthenticationManagerBuilder 的源码比较长,我们来看几个关键的方法:

1
2
3
4
5
6
7
8
9
10
11
12
13
14
15
16
17
18
19
20
21
22
23
24
25
26
27
28
29
30
31
32
33
34
35
36
37
38
39
40
41
42
43
44
45
46
47
48
public class AuthenticationManagerBuilder
extends
AbstractConfiguredSecurityBuilder<AuthenticationManager, AuthenticationManagerBuilder>
implements ProviderManagerBuilder<AuthenticationManagerBuilder> {
public AuthenticationManagerBuilder(ObjectPostProcessor<Object> objectPostProcessor) {
super(objectPostProcessor, true);
}
public AuthenticationManagerBuilder parentAuthenticationManager(
AuthenticationManager authenticationManager) {
if (authenticationManager instanceof ProviderManager) {
eraseCredentials(((ProviderManager) authenticationManager)
.isEraseCredentialsAfterAuthentication());
}
this.parentAuthenticationManager = authenticationManager;
return this;
}
public InMemoryUserDetailsManagerConfigurer<AuthenticationManagerBuilder> inMemoryAuthentication()
throws Exception {
return apply(new InMemoryUserDetailsManagerConfigurer<>());
}
public JdbcUserDetailsManagerConfigurer<AuthenticationManagerBuilder> jdbcAuthentication()
throws Exception {
return apply(new JdbcUserDetailsManagerConfigurer<>());
}
public <T extends UserDetailsService> DaoAuthenticationConfigurer<AuthenticationManagerBuilder, T> userDetailsService(
T userDetailsService) throws Exception {
this.defaultUserDetailsService = userDetailsService;
return apply(new DaoAuthenticationConfigurer<>(
userDetailsService));
}
@Override
protected ProviderManager performBuild() throws Exception {
if (!isConfigured()) {
logger.debug("No authenticationProviders and no parentAuthenticationManager defined. Returning null.");
return null;
}
ProviderManager providerManager = new ProviderManager(authenticationProviders,
parentAuthenticationManager);
if (eraseCredentials != null) {
providerManager.setEraseCredentialsAfterAuthentication(eraseCredentials);
}
if (eventPublisher != null) {
providerManager.setAuthenticationEventPublisher(eventPublisher);
}
providerManager = postProcess(providerManager);
return providerManager;
}
}
  1. 首先,我们可以通过调用 parentAuthenticationManager 方法来给一个 AuthenticationManager 设置 parent。
  2. inMemoryAuthentication、jdbcAuthentication 以及 userDetailsService 几个方法松哥在之前的文章中都已经介绍过了(深入理解 SecurityConfigurer 【源码篇】),作用就是为了配置数据源,这里就不再赘述。
  3. 最后就是 performBuild 方法,这个方法的作用就是根据当前 AuthenticationManagerBuilder 来构建一个 AuthenticationManager 出来,AuthenticationManager 本身是一个接口,它的默认实现是 ProviderManager,所以这里构建的就是 ProviderManager。在构建 ProviderManager 时,一方面传入 authenticationProviders,就是该 ProviderManager 所管理的所有的 AuthenticationProvider,另一方面传入 ProviderManager 的 parent(其实也是一个 ProviderManager)。

整体来说,这段代码还是很好理解的,松哥在之前的文章中和大家介绍过 Spring Security 整合多个数据源,那个时候我们自己配置 ProviderManager,跟这里的方式类似,具体可以参考:Spring Security 可以同时对接多个用户表?

不过自己配置有一个问题就是我们没有配置 ProviderManager 的 parent,没有配置的话,如果当前 ProviderManager 中认证失败的话,就直接抛出失败,而不会去 parent 中再次进行认证了(一般来说也不需要,如果系统比较复杂的话,可能需要)。

AuthenticationManagerBuilder 还有一个实现类叫做 DefaultPasswordEncoderAuthenticationManagerBuilder,作为内部类分别定义在 WebSecurityConfigurerAdapter 和 AuthenticationConfiguration 中,不过 DefaultPasswordEncoderAuthenticationManagerBuilder 的内容比较简单,重写了父类 AuthenticationManagerBuilder 的几个方法,配置了新的 PasswordEncoder,无他,所以这里我就不列出这个的源码了,感兴趣的小伙伴可以自行查看。但是这并不是说 DefaultPasswordEncoderAuthenticationManagerBuilder 就不重要了,因为在后面的使用中,基本上都是使用 DefaultPasswordEncoderAuthenticationManagerBuilder 来构建 AuthenticationManagerBuilder。

好啦,这就是 AuthenticationManagerBuilder。

那么是什么时候通过 AuthenticationManagerBuilder 来构建 AuthenticationManager 的呢?

这就涉及到我们的老熟人 WebSecurityConfigurerAdapter 了。当然,关于 WebSecurityConfigurerAdapter 本身的初始化过程,松哥在后面会专门写文章介绍,今天我们主要来看下如何在 WebSecurityConfigurerAdapter 中开启 AuthenticationManager 的初始化的。

2.1 初始化流程

在初始化流程中,松哥得先和大家介绍一个 AuthenticationConfiguration 类。这个类大家可以当作是一个全局被配类来理解,里边都是一些全局属性的配置:

1
2
3
4
5
6
7
8
9
10
11
12
13
14
15
16
17
18
19
20
21
22
23
24
25
26
27
28
29
30
31
32
33
34
35
36
37
38
39
40
41
42
43
44
45
46
47
48
49
50
51
52
53
54
55
56
57
58
59
60
61
62
63
64
65
66
67
68
69
70
71
72
73
74
75
76
77
78
79
80
81
82
83
84
85
@Configuration(proxyBeanMethods = false)
@Import(ObjectPostProcessorConfiguration.class)
public class AuthenticationConfiguration {
@Bean
public AuthenticationManagerBuilder authenticationManagerBuilder(
ObjectPostProcessor<Object> objectPostProcessor, ApplicationContext context) {
LazyPasswordEncoder defaultPasswordEncoder = new LazyPasswordEncoder(context);
AuthenticationEventPublisher authenticationEventPublisher = getBeanOrNull(context, AuthenticationEventPublisher.class);

DefaultPasswordEncoderAuthenticationManagerBuilder result = new DefaultPasswordEncoderAuthenticationManagerBuilder(objectPostProcessor, defaultPasswordEncoder);
if (authenticationEventPublisher != null) {
result.authenticationEventPublisher(authenticationEventPublisher);
}
return result;
}

@Bean
public static GlobalAuthenticationConfigurerAdapter enableGlobalAuthenticationAutowiredConfigurer(
ApplicationContext context) {
return new EnableGlobalAuthenticationAutowiredConfigurer(context);
}

@Bean
public static InitializeUserDetailsBeanManagerConfigurer initializeUserDetailsBeanManagerConfigurer(ApplicationContext context) {
return new InitializeUserDetailsBeanManagerConfigurer(context);
}

@Bean
public static InitializeAuthenticationProviderBeanManagerConfigurer initializeAuthenticationProviderBeanManagerConfigurer(ApplicationContext context) {
return new InitializeAuthenticationProviderBeanManagerConfigurer(context);
}

public AuthenticationManager getAuthenticationManager() throws Exception {
if (this.authenticationManagerInitialized) {
return this.authenticationManager;
}
AuthenticationManagerBuilder authBuilder = this.applicationContext.getBean(AuthenticationManagerBuilder.class);
if (this.buildingAuthenticationManager.getAndSet(true)) {
return new AuthenticationManagerDelegator(authBuilder);
}

for (GlobalAuthenticationConfigurerAdapter config : globalAuthConfigurers) {
authBuilder.apply(config);
}

authenticationManager = authBuilder.build();

if (authenticationManager == null) {
authenticationManager = getAuthenticationManagerBean();
}

this.authenticationManagerInitialized = true;
return authenticationManager;
}

@Autowired
public void setApplicationContext(ApplicationContext applicationContext) {
this.applicationContext = applicationContext;
}

@Autowired
public void setObjectPostProcessor(ObjectPostProcessor<Object> objectPostProcessor) {
this.objectPostProcessor = objectPostProcessor;
}

private static class EnableGlobalAuthenticationAutowiredConfigurer extends
GlobalAuthenticationConfigurerAdapter {
private final ApplicationContext context;
private static final Log logger = LogFactory
.getLog(EnableGlobalAuthenticationAutowiredConfigurer.class);

EnableGlobalAuthenticationAutowiredConfigurer(ApplicationContext context) {
this.context = context;
}

@Override
public void init(AuthenticationManagerBuilder auth) {
Map<String, Object> beansWithAnnotation = context
.getBeansWithAnnotation(EnableGlobalAuthentication.class);
if (logger.isDebugEnabled()) {
logger.debug("Eagerly initializing " + beansWithAnnotation);
}
}
}
}
  1. 这里首先构建了一个 AuthenticationManagerBuilder 实例,这个实例就是用来构建全局 AuthenticationManager 的 AuthenticationManagerBuilder,具体的构建过程在下面的 getAuthenticationManager 方法中。不过这里的这个全局的 AuthenticationManagerBuilder 并非总是有用,为什么这么说呢?且看松哥下面的的分析。
  2. 另外还有一些 initializeXXX 方法,用来构建全局的 UserDetailService 和 AuthenticationProvider,这些方法小伙伴可以作为一个了解,因为正常情况下是不会用到这几个 Bean 的,只有当 getAuthenticationManager 方法被调用时,这些默认的 Bean 才会被配置,而 getAuthenticationManager 方法被调用,意味着我们要使用系统默认配置的 AuthenticationManager 作为 parent,而在实际使用中,我们一般不会使用系统默认配置的 AuthenticationManager 作为 parent,我们自己多多少少都会重新定制一下。

这就是 AuthenticationConfiguration 的主要功能,它主要是提供了一些全局的 Bean,这些全局的 Bean 虽然一定会初始化,但是并非一定用到。

那么到底什么时候用到,什么时候用不到,这就和 WebSecurityConfigurerAdapter 有关了,在 WebSecurityConfigurerAdapter 中有三个重要的方法涉及到 AuthenticationManager 的初始化问题,第一个是 setApplicationContext 方法:

1
2
3
4
5
6
7
8
9
10
11
12
13
14
15
16
17
18
public void setApplicationContext(ApplicationContext context) {
this.context = context;
ObjectPostProcessor<Object> objectPostProcessor = context.getBean(ObjectPostProcessor.class);
LazyPasswordEncoder passwordEncoder = new LazyPasswordEncoder(context);
authenticationBuilder = new DefaultPasswordEncoderAuthenticationManagerBuilder(objectPostProcessor, passwordEncoder);
localConfigureAuthenticationBldr = new DefaultPasswordEncoderAuthenticationManagerBuilder(objectPostProcessor, passwordEncoder) {
@Override
public AuthenticationManagerBuilder eraseCredentials(boolean eraseCredentials) {
authenticationBuilder.eraseCredentials(eraseCredentials);
return super.eraseCredentials(eraseCredentials);
}
@Override
public AuthenticationManagerBuilder authenticationEventPublisher(AuthenticationEventPublisher eventPublisher) {
authenticationBuilder.authenticationEventPublisher(eventPublisher);
return super.authenticationEventPublisher(eventPublisher);
}
};
}

在该方法中,创建了两个几乎一摸一样的 AuthenticationManagerBuilder 实例,为什么会有两个呢?第一个 authenticationBuilder 是一个局部的 AuthenticationManagerBuilder,将来会传入 HttpSecurity 中去构建局部的 AuthenticationManager;第二个 localConfigureAuthenticationBldr 则是一个用来构建全局 AuthenticationManager 的 AuthenticationManagerBuilder。

有小伙伴会问了,构建全局的 AuthenticationManager 不是一开始就在 AuthenticationConfiguration 中创建了吗?为什么这里还有一个?是的,当前这个 localConfigureAuthenticationBldr 是可以禁用的,如果禁用了,就会使用 AuthenticationConfiguration 中提供的 AuthenticationManagerBuilder,如果没禁用,就使用 localConfigureAuthenticationBldr 来构建全局的 AuthenticationManager。

另一个方法则是 getHttp 方法:

1
2
3
4
5
6
7
8
9
10
11
12
13
14
protected final HttpSecurity getHttp() throws Exception {
if (http != null) {
return http;
}
AuthenticationEventPublisher eventPublisher = getAuthenticationEventPublisher();
localConfigureAuthenticationBldr.authenticationEventPublisher(eventPublisher);
AuthenticationManager authenticationManager = authenticationManager();
authenticationBuilder.parentAuthenticationManager(authenticationManager);
Map<Class<?>, Object> sharedObjects = createSharedObjects();
http = new HttpSecurity(objectPostProcessor, authenticationBuilder,
sharedObjects);
//省略
return http;
}

在 getHttp 方法中,会首先调用 authenticationManager 方法去获取一个全局的 AuthenticationManager,并设置给 authenticationBuilder 作为 parent,然后在构建 HttpSecurity 时将 authenticationBuilder 传入进去。

那么接下来就是 authenticationManager() 方法到底是怎么执行的了:

1
2
3
4
5
6
7
8
9
10
11
12
13
14
15
16
17
protected AuthenticationManager authenticationManager() throws Exception {
if (!authenticationManagerInitialized) {
configure(localConfigureAuthenticationBldr);
if (disableLocalConfigureAuthenticationBldr) {
authenticationManager = authenticationConfiguration
.getAuthenticationManager();
}
else {
authenticationManager = localConfigureAuthenticationBldr.build();
}
authenticationManagerInitialized = true;
}
return authenticationManager;
}
protected void configure(AuthenticationManagerBuilder auth) throws Exception {
this.disableLocalConfigureAuthenticationBldr = true;
}

可以看到,如果 AuthenticationManager 还没初始化,那就先进行初始化。初始化首先调用 configure 方法,默认情况下,configure 方法里边会把 disableLocalConfigureAuthenticationBldr 变量设置为 true,这样接下来就会进入到 if 分支中了。这个 configure 方法不知道大家有没有觉得眼熟?我们在自定义的 SecurityConfig 配置类中,一般都是要重写该方法的,一旦重写了这个方法,那么 disableLocalConfigureAuthenticationBldr 变量就不会变为 true,依然是 false,这样在获取 authenticationManager 的时候就会进入到 else 分支中。

如果进入到 if 分支中,意味着开发者并没有重写 configure 方法,AuthenticationManagerBuilder 就使用默认的,大家可以看到,此时就是调用 authenticationConfiguration.getAuthenticationManager() 方法去获取 AuthenticationManager,也就是一开始我们说的那个全局的配置。

如果开发者重写了 configure 方法,意味着开发者对 AuthenticationManagerBuilder 进行了一些定制,此时就不能继续使用 AuthenticationConfiguration 中配置的默认的的 AuthenticationManager 了,而要根据开发者 的具体配置,调用 localConfigureAuthenticationBldr.build 方法去构建新的 AuthenticationManager。

一言以蔽之,AuthenticationConfiguration 中的配置有没有用上,全看开发者有没有重写 configure(AuthenticationManagerBuilder auth) 方法,重写了,就用 localConfigureAuthenticationBldr 来构建 parent 级别的 AuthenticationManager,没重写,就用 AuthenticationConfiguration 中的方法来构建。

这是扮演 parent 角色的 AuthenticationManager 的构建过程,当然,parent 并非必须,如果你没有这个需求的话,也可以不配置 parent。

最后我们再来看下局部的 AuthenticationManager 是如何构建的,也就是和 HttpSecurity 绑定的那个 AuthenticationManager。

根据前面的介绍,HttpSecurity 在构建的时候就会传入 AuthenticationManagerBuilder,如下:

1
2
3
4
5
6
7
8
public HttpSecurity(ObjectPostProcessor<Object> objectPostProcessor,
AuthenticationManagerBuilder authenticationBuilder,
Map<Class<?>, Object> sharedObjects) {
super(objectPostProcessor);
Assert.notNull(authenticationBuilder, "authenticationBuilder cannot be null");
setSharedObject(AuthenticationManagerBuilder.class, authenticationBuilder);
//省略
}

传入进来的 AuthenticationManagerBuilder ,二话不说就存到 SharedObject 里边去了,这个根据官方的注释,说它是一个在不同 Configurer 中共享的对象的工具,其实你可以理解为一个缓存,现在存进去,需要的时候再取出来。

取出来的方法,在 HttpSecurity 中也定义好了,如下:

1
2
3
private AuthenticationManagerBuilder getAuthenticationRegistry() {
return getSharedObject(AuthenticationManagerBuilder.class);
}

在 HttpSecurity 中,凡是涉及到 AuthenticationManager 配置的,都会调用到 getAuthenticationRegistry 方法,如下:

1
2
3
4
5
6
7
8
9
10
public HttpSecurity userDetailsService(UserDetailsService userDetailsService)
throws Exception {
getAuthenticationRegistry().userDetailsService(userDetailsService);
return this;
}
public HttpSecurity authenticationProvider(
AuthenticationProvider authenticationProvider) {
getAuthenticationRegistry().authenticationProvider(authenticationProvider);
return this;
}

最后在 HttpSecurity 的 beforeConfigure 方法中完成构建:

1
2
3
4
@Override
protected void beforeConfigure() throws Exception {
setSharedObject(AuthenticationManager.class, getAuthenticationRegistry().build());
}

至此,无论是全局的 AuthenticationManager,还是局部的 AuthenticationManager,就都和大家捋一遍了。

3.小结

有的小伙伴可能对这里的全局、局部不是特别理解,我再给大家稍微总结一下。

为什么每一个 HttpSecurity 都要绑定一个 AuthenticationManager?

因为在同一个系统中,我们可以回配置多个 HttpSecurity,也就是多个不同的过滤器链(参见Spring Security 竟然可以同时存在多个过滤器链?一文),既然有多个过滤器链,每一个请求到来的时候,它需要进入到某一个过滤器链中去处理,每一个过滤器链中又会涉及到 AuthenticationProvider 的管理,不同过滤器链中的 AuthenticationProvider 肯定是各自管理最为合适,也就是不同的过滤器链中都有一个绑定的 AuthenticationManager,即每一个 HttpSecurity 都要绑定一个 AuthenticationManager。

本文略有难度,可能有点绕,有没看懂的地方,欢迎大家留言讨论。

如果小伙伴们觉得有收获,记得点个在看鼓励下松哥哦~

喜欢这篇文章吗?扫码关注公众号【江南一点雨】【江南一点雨】专注于 SPRING BOOT+微服务以及前后端分离技术,每天推送原创技术干货,关注后回复 JAVA,领取松哥为你精心准备的 JAVA 干货!

评论

Your browser is out-of-date!

Update your browser to view this website correctly. Update my browser now

×