Swagger 好早之前就更新到 3 了,不过一直没空和小伙伴们分享下具体玩法,主要是也是因为 Swagger 虽然升级了,但是我们在 Spring Boot 中却依然可以使用老版本的 Swagger,不过好像是从 Spring Boot2.6 开始,你会发现用不了老版本的 Swagger 了,哎,反正迟早都得搞,那不如就今天吧!
今天我们就来看看,在 Spring Boot2.7.1 中如何使用 Swagger3。
1. 依赖
首先我们创建一个 Spring Boot 项目,引入 Swagger3 依赖,如下:
1
2
3
4
5
| <dependency>
<groupId>io.springfox</groupId>
<artifactId>springfox-boot-starter</artifactId>
<version>3.0.0</version>
</dependency>
|
以前在 Swagger2 的时代,这个依赖我们需要引入两个,现在就只需要这一个即可。
2. 配置
接下来在启动类上添加两个注解,开启 Swagger:
1
2
3
4
5
6
7
8
9
10
11
12
| @SpringBootApplication
@EnableSwagger2
@EnableOpenApi
@EnableWebMvc
public class SwaggerDemoApplication {
public static void main(String[] args) {
SpringApplication.run(SwaggerDemoApplication.class, args);
}
}
|
现在,基本工作就已经完成了,此时即使我们不做任何额外的事情,Swagger 文档也已经可以自动生成了。
启动项目,浏览器输入 http://localhost:8080/swagger-ui/index.html 查看 Swagger 文档:

小伙伴们需要注意,这个默认的文档访问路径跟以前的 Swagger2 不一样哦!
现在扫描出来的接口中有一个是 BasicErrorController,这个是 Spring Boot 默认提供的异常处理器,因为我们现在没有为 Swagger 设置包扫描路径,所以就连同这个一起被扫描出来了。
好了,现在我们可以对这个网页稍微做一些定制,如下:
1
2
3
4
5
6
7
8
9
10
11
12
13
14
15
16
17
18
19
20
21
22
| @Configuration
public class Swagger2Config {
@Bean
Docket docket() {
return new Docket(DocumentationType.OAS_30)
.apiInfo(new ApiInfoBuilder()
.title("TienChin项目在线接口文档")
.version("v1.0")
.description("TienChin项目接口文档")
.contact(new Contact("javaboy", "http://www.javaboy.org", "111@qq.com"))
.build())
.select()
.apis(RequestHandlerSelectors.basePackage("org.javaboy.swagger_demo.controller"))
.build();
}
}
|
这段配置基本上和之前的 Swagger2 的一致,配置完成后,Swagger 页面的基本信息就会更新过来:

3. 接口配置
接下来就是一些具体的接口配置了。
这个和 Swagger2 也基本一致,而且很容易懂,下面我来分别向小伙伴们举例说明:
1
2
3
4
5
6
7
8
9
10
11
12
13
14
15
16
17
18
19
20
21
22
23
24
25
26
27
| @RestController
@Api(tags = "用户管理相关接口")
@RequestMapping("/user")
public class UserController {
@PostMapping("/")
@ApiOperation("添加用户的接口")
@ApiImplicitParams({
@ApiImplicitParam(name = "username", value = "用户名", defaultValue = "李四"),
@ApiImplicitParam(name = "address", value = "用户地址", defaultValue = "深圳", required = true)
})
public RespBean addUser(String username, @RequestParam(required = true) String address) {
return new RespBean();
}
@GetMapping("/")
@ApiOperation("根据id查询用户的接口")
@ApiImplicitParam(name = "id", value = "用户id", defaultValue = "99", required = true)
public User getUserById(@PathVariable Integer id) {
User user = new User();
user.setId(id);
return user;
}
@PutMapping("/{id}")
@ApiOperation("根据id更新用户的接口")
public User updateUserById(@RequestBody User user) {
return user;
}
}
|
这里边涉及到多个 API,我来向小伙伴们分别说明:
- @Api 注解可以用来标记当前 Controller 的功能。
- @ApiOperation 注解用来标记一个方法的作用。
- @ApiImplicitParam 注解用来描述一个参数,可以配置参数的中文含义,也可以给参数设置默认值,这样在接口测试的时候可以避免手动输入。
- 如果有多个参数,则需要使用多个 @ApiImplicitParam 注解来描述,多个 @ApiImplicitParam 注解需要放在一个 @ApiImplicitParams 注解中。
- 需要注意的是,@ApiImplicitParam 注解中虽然可以指定参数是必填的,但是却不能代替 @RequestParam(required = true) ,前者的必填只是在 Swagger 框架内必填,抛弃了 Swagger ,这个限制就没用了,所以假如开发者需要指定一个参数必填, @RequestParam(required = true) 注解还是不能省略。
- 如果参数是一个对象(例如上文的更新接口),对于参数的描述也可以放在实体类中。例如下面一段代码:
1
2
3
4
5
6
7
8
9
10
| @ApiModel
public class User {
@ApiModelProperty(value = "用户id")
private Integer id;
@ApiModelProperty(value = "用户名")
private String username;
@ApiModelProperty(value = "用户地址")
private String address;
}
|
好了,经过如上配置之后,接下来,刷新刚刚打开的页面,可以看到如下效果:
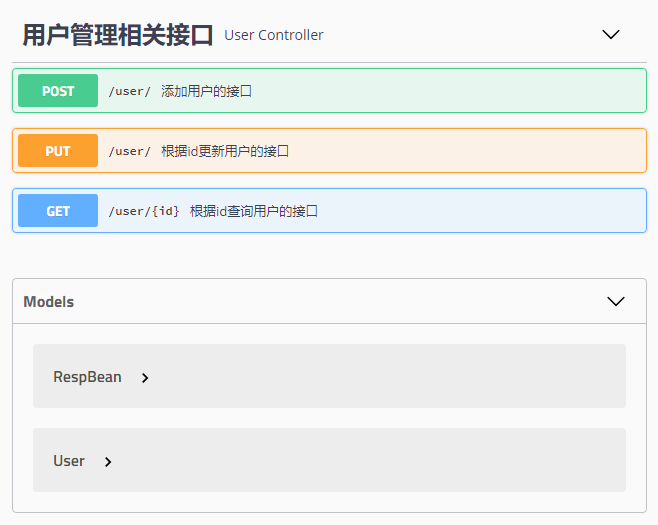
可以看到,所有的接口这里都列出来了,包括接口请求方式,接口地址以及接口的名字等,点开一个接口,可以看到如下信息:
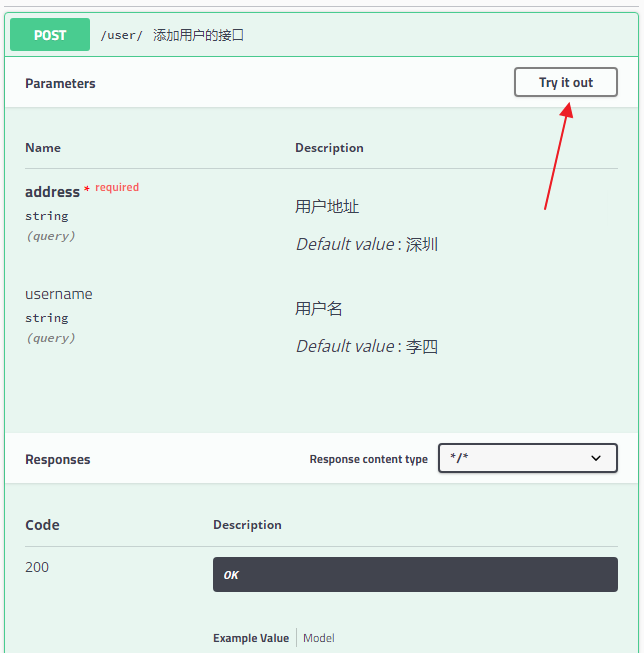
可以看到,接口的参数,参数要求,参数默认值等等统统都展示出来了,参数类型下的 query 表示参数以 key/value 的形式传递,点击右上角的 Try it out,就可以进行接口测试:
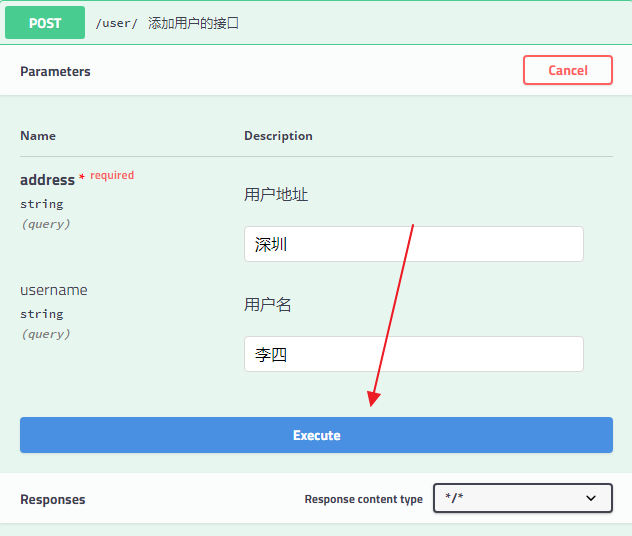
点击 Execute 按钮,表示发送请求进行测试。测试结果会展示在下面的 Response 中。
小伙伴们注意,参数类型下面的 query 表示参数以 key/value 的形式传递,这里的值也可能是 body,body 表示参数以请求体的方式传递,例如上文的更新接口,如下:

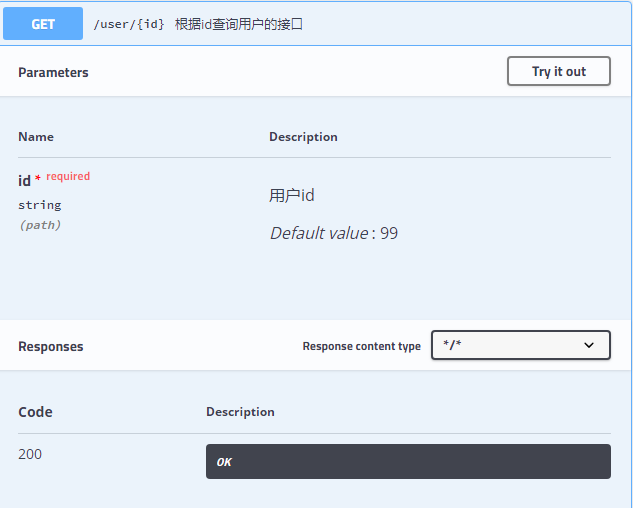
当然还有一种可能就是这里的参数为 path,表示参数放在路径中传递,例如根据 id 查询用户的接口:
当然,除了这些之外,还有一些响应值的注解,都比较简单,小伙伴可以自己摸索下。
4. 在 Security 中的配置
如果我们的 Spring Boot 项目中集成了 Spring Security,那么如果不做额外配置,Swagger 文档可能会被拦截,此时只需要在 Spring Security 的配置类中为 Swagger 相关的文件和接口放行即可(SpringBoot2.7.1 最新写法):
1
2
3
4
5
6
7
8
9
10
11
12
13
14
| @Configuration
public class SecurityConfig {
@Bean
WebSecurityCustomizer webSecurityCustomizer() {
return new WebSecurityCustomizer() {
@Override
public void customize(WebSecurity web) {
web.ignoring().antMatchers("/swagger-ui/**")
.antMatchers("/swagger-resources/**")
.antMatchers("/v3/**");
}
};
}
}
|
如此之后,Swagger 文件就不需要认证就能访问了。不知道小伙伴们有没有看懂呢?有问题欢迎留言讨论。