Spring 中 @Qualifier 注解还能这么用?

[TOC]

今天想和小伙伴们聊一聊 @Qualifier 注解的完整用法,同时也顺便分析一下它的实现原理。

说到 @Qualifier,有的小伙伴可能会觉得诧异,这也只得写一篇文章?确实,但凡有点开发经验,多多少少可能都遇到过 @Qualifier 注解的使用场景,然而,对于大部分小伙伴来说,我们平时开发遇到的 @Qualifier 注解使用场景,只是 @Qualifier 注解功能中很小的一部分而已,今天咱们就来完整的捋一捋。

1. 基本用法

首先和小伙伴们回顾一下 @Qualifier 注解的基本用法,基本用法我从四个方面来和大家介绍,只有先把这些基本用法捋清楚了,在看源码的时候才会有种醍醐灌顶的感觉。

1.1 指定 Bean 名称

说到 @Qualifier 注解,大家最容易想到的就是处理 Bean 注入的问题了,假设我有如下 Bean:

1
2
3
4
5
6
7
8
9
10
11
12
13
@Configuration
@ComponentScan
public class JavaConfig {
@Bean(value = "b1")
B b1() {
return new B();
}

@Bean("b2")
B b2() {
return new B();
}
}

将 B 向 Spring 容器中注册了两个,名字分别是 b1 和 b2。

现在在 A 中想要使用 B,如下:

1
2
3
4
5
@Component
public class A {
@Autowired
B b;
}

由于 @Autowired 注解是按照类型进行 Bean 的注入的,此时 Spring 容器中存在两个 B 实例,那么注入就会出错,通过 @Qualifier 注解我们可以指定具体想要使用哪一个 Bean:

1
2
3
4
5
6
@Component
public class A {
@Autowired
@Qualifier("b1")
B b;
}

这样就指定了在注入时使用 b1 这个对象了。

当然,对于这个问题,其实解决方案很多,如使用 @Primary 注解、使用 @Bean 注解但是额外加配置等都能解决问题,不过本文主题是 @Qualifier,所以暂时先不和大家讨论其它方案。

1.2 不指定 Bean 名称

在 1.1 小节中,我们使用 @Qualifier 注解时指定了需要注入的 Bean 名称,其实也可以不指定 Bean 名称,不指定 Bean 名称的话,我们就需要在两个地方进行配置。

首先在 Bean 注入的时候,添加 @Qualifier 注解:

1
2
3
4
5
6
7
8
9
10
11
12
13
14
@Configuration
@ComponentScan
public class JavaConfig {
@Bean(value = "b1")
@Qualifier
B b1() {
return new B();
}

@Bean("b2")
B b2() {
return new B();
}
}

大家看到,这里给 b1 添加了 @Qualifier 注解,但是未设置任何 value,然后在需要进行 B 对象注入的地方,也添加 @Qualifier 注解:

1
2
3
4
5
6
@Component
public class A {
@Autowired
@Qualifier
B b;
}

这样也能解决问题。

1.3 自定义注解

例如我可以自定义一个注解,专门用来注入 b1 对象的注解,如下:

1
2
3
4
5
6
@Retention(RetentionPolicy.RUNTIME)
@Inherited
@Target({ElementType.FIELD,ElementType.METHOD,ElementType.TYPE,ElementType.ANNOTATION_TYPE})
@Qualifier
public @interface B1Qualifier {
}

然后分别在注册 Bean 和使用 Bean 的时候,添加该注解:

1
2
3
4
5
6
7
8
9
10
11
12
13
14
15
16
17
18
19
20
@Configuration
@ComponentScan
public class JavaConfig {
@Bean(value = "b1")
@B1Qualifier
B b1() {
return new B();
}

@Bean("b2")
B b2() {
return new B();
}
}
@Component
public class A {
@Autowired
@B1Qualifier
B b;
}

这样也是一个问题解决办法。

1.4 XML 中的配置

前面跟大家说的都是在 Java 代码中进行配置的,我们也可以通过 XML 文件进行配置,并且在 XML 文件配置的过程中,还可以配置多个不同的属性,我举个例子。

假设我现在准备向 Spring 容器中注入两个 B,如下:

1
2
3
4
5
6
7
<bean class="org.javaboy.bean.p3.B" id="b1">
<qualifier value="b11" type="org.springframework.beans.factory.annotation.Qualifier">
</qualifier>
</bean>
<bean class="org.javaboy.bean.p3.B" id="b2">
<qualifier/>
</bean>

小伙伴们看到,在第一个 bean 标签中,我加入了 qualifier 标签,这个标签的 value 是 b11,type 则是 @Qualifier 本身,这个 type 其实也可以不配置,不配置的话默认也是 @Qualifier 注解本身;在第二个 bean 标签中我只加了 qualifier 标签,并未配置任何属性(相当于 1.2 小节的案例)。

现在,当我想要在 A 中注入 B 的时候,可以按照如下方式来:

1
2
3
4
5
6
@Component
public class A {
@Autowired
@Qualifier("b11")
B b;
}

大家注意,这里 @Qualifier 注解的 value 是 b11,对应了 qualifier 标签中的 value 属性,表示将 id 为 b1 的 Bean 注入到 A 中的 b 属性上。

如果没有为 @Qualifier 设置 value,那么就会将 id 为 b2 的 Bean 注入进来,这个就相当于我们前面 1.2 小节的案例。

前面我们使用的是 @Qualifier 注解中的 value 属性,实际上,qualifier 标签支持更多的属性定义。但问题是 @Qualifier 注解只有一个 value 属性,如果想要使用其它的属性进行匹配,那么就得使用自定义注解了(当然,这种场景实际上使用较少)。

如果想要自定义注解去匹配 qualifier 标签中提供的多种属性,那么我们可以按照如下方式来进行配置。

首先我们自定义注解,如下:

1
2
3
4
5
6
7
@Retention(RetentionPolicy.RUNTIME)
@Inherited
@Target({ElementType.FIELD,ElementType.METHOD,ElementType.TYPE,ElementType.ANNOTATION_TYPE})
@Qualifier
public @interface MyQualifier {
String name() default "";
}

这是一个组合注解,本质上还是 @Qualifier,但是现在多了一个我们自定义的 name 属性。

接下来在 XML 中使用该注解:

1
2
3
4
5
6
7
8
9
10
<bean class="org.javaboy.bean.p3.B" id="b1">
<qualifier type="org.javaboy.bean.p3.MyQualifier">
<attribute key="name" value="b11"/>
</qualifier>
</bean>
<bean class="org.javaboy.bean.p3.B" id="b2">
<qualifier type="org.javaboy.bean.p3.MyQualifier">
<attribute key="name" value="b22"/>
</qualifier>
</bean>

接下来在 Bean 注入的时候,就可以使用 @MyQualifier 进行匹配了:

1
2
3
4
5
6
@Component
public class A {
@Autowired
@MyQualifier(name = "b11")
B b;
}

这个就表示匹配 name 属性为 b11 的 Bean。

以上基本上就是 @Qualifier 注解在 Spring 容器中的一些用法了,接下来松哥将通过源码分析,来和小伙伴们一起探讨上面这些功能到底是怎么实现的。

2. 源码分析

为了小伙伴们能轻松掌握 @Qualifier 的源码,一些前置的步骤我这里就不和大家分析了,重点就看 @Qualifier 注解的处理过程,其他未尽内容,将在后续文章中我会继续和大家分享。

由于 @Qualifier 注解一般都是搭配 @Autowired 注解一起使用的,所以解析 @Qualifier 注解的源码离不开 @Autowired 的注入过程,刚好松哥在之前的文章中已经和小伙伴们聊过 @Autowired 注解的注入过程了,还没看过该文章的小伙伴建议先阅读该文章,这有助于理解接下来的内容。

2.1 doResolveDependency

@Autowired 到底是怎么把变量注入进来的?的 3.3 小节中,我们提到,给 A 注入 B 的时候,会调用到 doResolveDependency 方法,我们再来看下该方法:

DefaultListableBeanFactory#doResolveDependency:

1
2
3
4
5
6
7
8
9
10
11
12
13
@Nullable
public Object doResolveDependency(DependencyDescriptor descriptor, @Nullable String beanName,
@Nullable Set<String> autowiredBeanNames, @Nullable TypeConverter typeConverter) throws BeansException {
//...
Map<String, Object> matchingBeans = findAutowireCandidates(beanName, type, descriptor);
if (matchingBeans.isEmpty()) {
if (isRequired(descriptor)) {
raiseNoMatchingBeanFound(type, descriptor.getResolvableType(), descriptor);
}
return null;
}
//...
}

在这个方法中,首先调用了 findAutowireCandidates 方法去找到所有满足条件的 Class。Map 中的 key 就是 Bean 的名称,value 则是一个 Class,此时还没有实例化。

对于 @Qualifier 注解的处理就在 findAutowireCandidates 方法中。

2.2 findAutowireCandidates
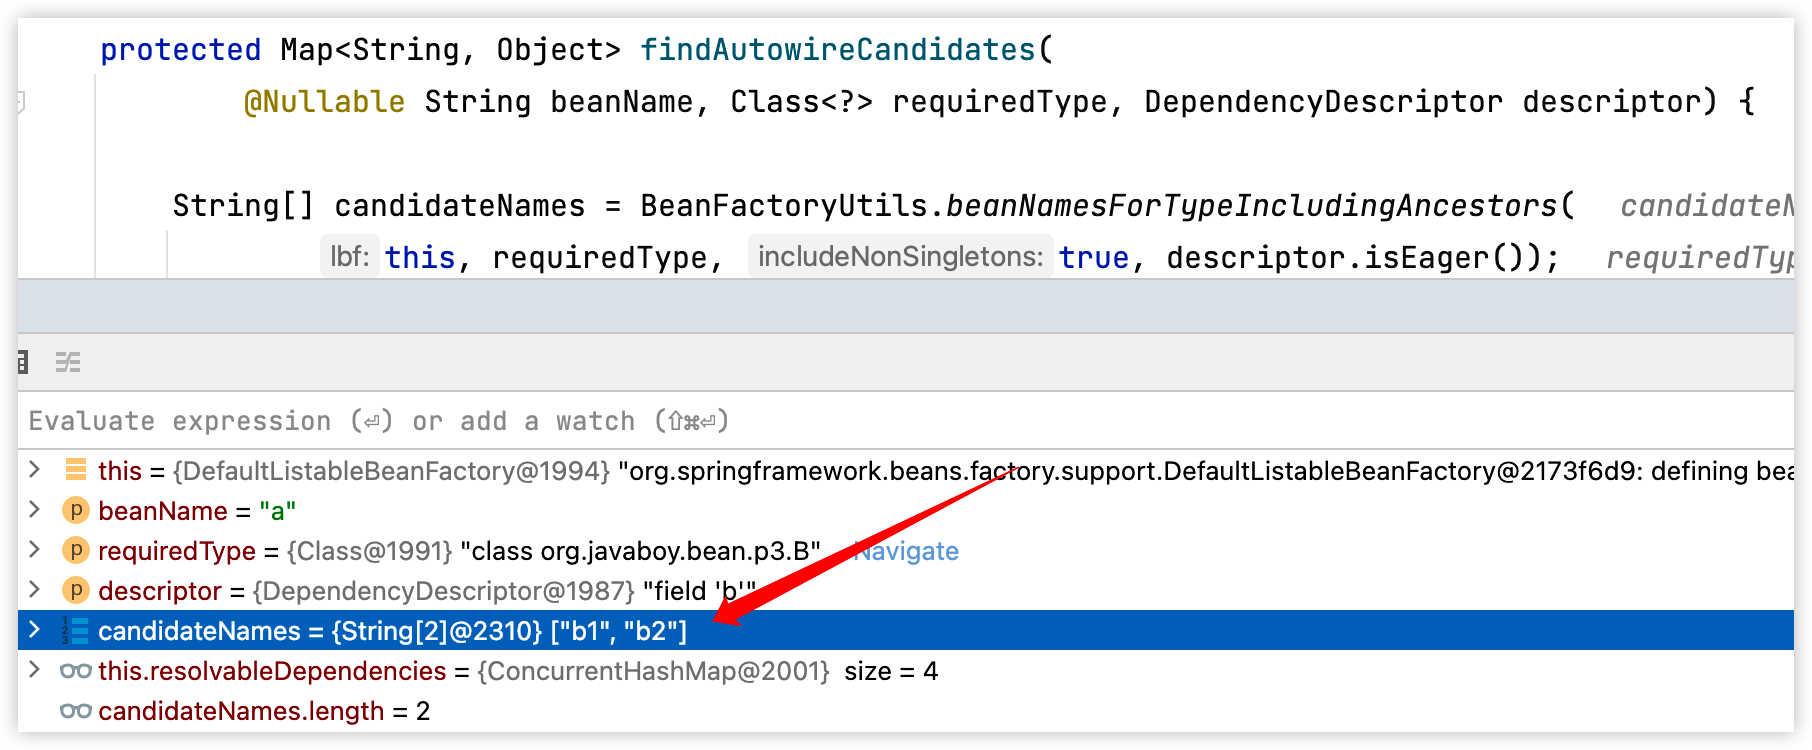
1
2
3
4
5
6
7
8
9
10
11
12
13
protected Map<String, Object> findAutowireCandidates(
@Nullable String beanName, Class<?> requiredType, DependencyDescriptor descriptor) {
String[] candidateNames = BeanFactoryUtils.beanNamesForTypeIncludingAncestors(
this, requiredType, true, descriptor.isEager());
//...
for (String candidate : candidateNames) {
if (!isSelfReference(beanName, candidate) && isAutowireCandidate(candidate, descriptor)) {
addCandidateEntry(result, candidate, descriptor, requiredType);
}
}
//...
return result;
}

在这个方法中,首先调用 BeanFactoryUtils.beanNamesForTypeIncludingAncestors 方法查找出 B 这种类型的所有 beanName,对于本文一开始的案例来说,这里拿到两个 beanName,分别是 b1、b2,如下图:

接下来就去遍历 candidateNames,在遍历的时候,有两个判断条件:

  1. isSelfReference:这个方法是判断给定的 beanName 是否自引用,即是否指向原始 bean 或者原始 bean 上的工厂方法,这个判断跟本文案例关系不大。
  2. isAutowireCandidate:这个方法从名字上就能看出来,判断这个 beanName 是否是一个候选的注入 beanName,很明显,这个跟本文案例相关,我们继续来看该方法。

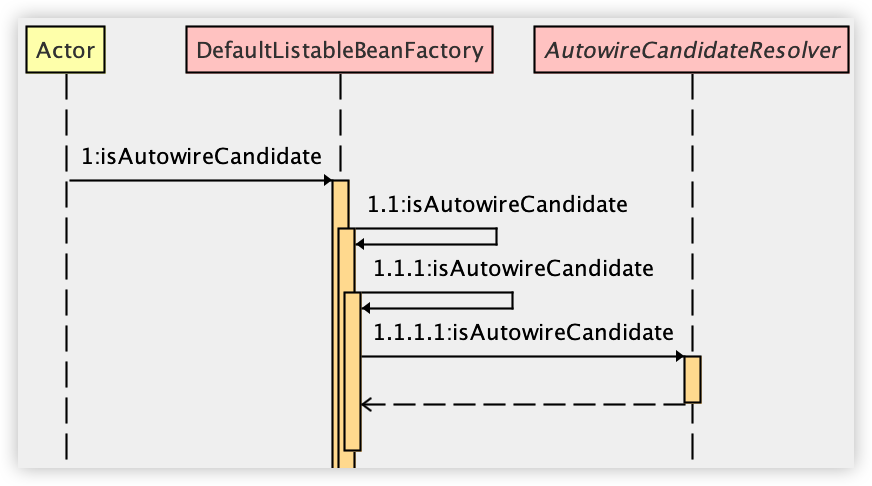
在 isAutowireCandidate 方法,又依次调了三次 isAutowireCandidate 方法,也就是说 isAutowireCandidate 方法一共调了四次之后,将会来到关键的 QualifierAnnotationAutowireCandidateResolver#isAutowireCandidate 方法中。

1
2
3
4
5
6
7
8
9
10
11
12
13
14
15
16
17
@Override
public boolean isAutowireCandidate(BeanDefinitionHolder bdHolder, DependencyDescriptor descriptor) {
boolean match = super.isAutowireCandidate(bdHolder, descriptor);
if (match) {
match = checkQualifiers(bdHolder, descriptor.getAnnotations());
if (match) {
MethodParameter methodParam = descriptor.getMethodParameter();
if (methodParam != null) {
Method method = methodParam.getMethod();
if (method == null || void.class == method.getReturnType()) {
match = checkQualifiers(bdHolder, methodParam.getMethodAnnotations());
}
}
}
}
return match;
}

在当前方法中,首先会调用 super.isAutowireCandidate 方法去判断这个 Bean 将来是否被允许注入到其他 Bean 中:

1
2
3
4
5
6
7
8
@Override
public boolean isAutowireCandidate(BeanDefinitionHolder bdHolder, DependencyDescriptor descriptor) {
if (!super.isAutowireCandidate(bdHolder, descriptor)) {
// If explicitly false, do not proceed with any other checks...
return false;
}
return checkGenericTypeMatch(bdHolder, descriptor);
}

这里又是两件事,第一个是调用父类方法进行判断,这里单纯只是判断 autowireCandidate 属性是否为 true,如果这个属性为 false,就表示这个 Bean 不能被注入到其他 Bean 中,默认情况下该属性为 true,如果想要设置这个属性为 false,则可以在 @Bean 注解中设置,如下:

1
2
3
4
@Bean(value = "b1",autowireCandidate = false)
B b1() {
return new B();
}

从这个层面讲,本文第一小节提出来的问题还有一种解决方案,就是把 autowireCandidate 属性设置为 false。

checkGenericTypeMatch 则主要是用来检查类型是否匹配,这个就不去细看了。

现在回到前面的 isAutowireCandidate 方法中,super.isAutowireCandidate 方法的匹配结果为 true,那么接下来就该 checkQualifiers 方法了。

checkQualifiers 方法从名字上就能看出来,就是用来检查 @Qualifier 注解的。

1
2
3
4
5
6
7
8
9
10
11
12
13
14
15
16
17
18
19
20
21
22
protected boolean checkQualifiers(BeanDefinitionHolder bdHolder, Annotation[] annotationsToSearch) {
if (ObjectUtils.isEmpty(annotationsToSearch)) {
return true;
}
SimpleTypeConverter typeConverter = new SimpleTypeConverter();
for (Annotation annotation : annotationsToSearch) {
Class<? extends Annotation> type = annotation.annotationType();
boolean checkMeta = true;
boolean fallbackToMeta = false;
if (isQualifier(type)) {
if (!checkQualifier(bdHolder, annotation, typeConverter)) {
fallbackToMeta = true;
}
else {
checkMeta = false;
}
}
if (checkMeta) {
//...
}
return true;
}

这个方法会遍历传进来的注解,传进来的注解数组是 A 中 B 属性上的所有注解,以本文第一小节的案例为 1,这里是有两个注解,分别是 @Autowired 和 @Qualifier。

在这个方法中会去遍历注解数组,判断注解是否为 @Qualifier 类型的,如果是,则调用 checkQualifier 方法做进一步检查。

isQualifier 方法的逻辑很简单:

1
2
3
4
5
6
7
8
protected boolean isQualifier(Class<? extends Annotation> annotationType) {
for (Class<? extends Annotation> qualifierType : this.qualifierTypes) {
if (annotationType.equals(qualifierType) || annotationType.isAnnotationPresent(qualifierType)) {
return true;
}
}
return false;
}

这个判断是遍历 qualifierTypes 集合,将集合中的注解类型挨个拿出来和传入的参数进行比对,之所以是一个集合而不是直接拿 @Qualifier 注解做比对,是因为这个注解在 JSR-330 中也有一个实现,如果项目用到了 JSR-330 的话,那么 qualifierTypes 集合中就有两个注解。

checkQualifier 方法算是整个 @Qualifier 处理最为核心的部分了:

1
2
3
4
5
6
7
8
9
10
11
12
13
14
15
16
17
18
19
20
21
22
23
24
25
26
27
28
29
30
31
32
33
34
35
36
37
38
39
40
41
42
43
44
45
46
47
48
49
50
51
52
53
54
55
56
57
58
59
60
61
62
63
64
65
66
67
68
69
70
71
72
73
74
75
76
77
protected boolean checkQualifier(
BeanDefinitionHolder bdHolder, Annotation annotation, TypeConverter typeConverter) {
Class<? extends Annotation> type = annotation.annotationType();
RootBeanDefinition bd = (RootBeanDefinition) bdHolder.getBeanDefinition();
AutowireCandidateQualifier qualifier = bd.getQualifier(type.getName());
if (qualifier == null) {
qualifier = bd.getQualifier(ClassUtils.getShortName(type));
}
if (qualifier == null) {
// First, check annotation on qualified element, if any
Annotation targetAnnotation = getQualifiedElementAnnotation(bd, type);
// Then, check annotation on factory method, if applicable
if (targetAnnotation == null) {
targetAnnotation = getFactoryMethodAnnotation(bd, type);
}
if (targetAnnotation == null) {
RootBeanDefinition dbd = getResolvedDecoratedDefinition(bd);
if (dbd != null) {
targetAnnotation = getFactoryMethodAnnotation(dbd, type);
}
}
if (targetAnnotation == null) {
// Look for matching annotation on the target class
if (getBeanFactory() != null) {
try {
Class<?> beanType = getBeanFactory().getType(bdHolder.getBeanName());
if (beanType != null) {
targetAnnotation = AnnotationUtils.getAnnotation(ClassUtils.getUserClass(beanType), type);
}
}
catch (NoSuchBeanDefinitionException ex) {
// Not the usual case - simply forget about the type check...
}
}
if (targetAnnotation == null && bd.hasBeanClass()) {
targetAnnotation = AnnotationUtils.getAnnotation(ClassUtils.getUserClass(bd.getBeanClass()), type);
}
}
if (targetAnnotation != null && targetAnnotation.equals(annotation)) {
return true;
}
}
Map<String, Object> attributes = AnnotationUtils.getAnnotationAttributes(annotation);
if (attributes.isEmpty() && qualifier == null) {
// If no attributes, the qualifier must be present
return false;
}
for (Map.Entry<String, Object> entry : attributes.entrySet()) {
String attributeName = entry.getKey();
Object expectedValue = entry.getValue();
Object actualValue = null;
// Check qualifier first
if (qualifier != null) {
actualValue = qualifier.getAttribute(attributeName);
}
if (actualValue == null) {
// Fall back on bean definition attribute
actualValue = bd.getAttribute(attributeName);
}
if (actualValue == null && attributeName.equals(AutowireCandidateQualifier.VALUE_KEY) &&
expectedValue instanceof String && bdHolder.matchesName((String) expectedValue)) {
// Fall back on bean name (or alias) match
continue;
}
if (actualValue == null && qualifier != null) {
// Fall back on default, but only if the qualifier is present
actualValue = AnnotationUtils.getDefaultValue(annotation, attributeName);
}
if (actualValue != null) {
actualValue = typeConverter.convertIfNecessary(actualValue, expectedValue.getClass());
}
if (!expectedValue.equals(actualValue)) {
return false;
}
}
return true;
}

来细细的说一下这个方法。

  1. 该方法首先获取到注解的类型,一般情况下,这里拿到的注解就是 @Qualifier,如果使用了自定义注解的话,那么这里拿到的就是自定义注意,需要和小伙伴么强调一下,这里的注解是指 A 类中 B 属性上的注解(并非提供 B 对象的 Java 方法上的注解)。
  2. 接下来会执行 bd.getQualifier 方法,分别以第 1 步中拿到的注解全路径(org.springframework.beans.factory.annotation.Qualifier)和短路径(Qualifier)为参数,去搜索看是否能够获取到一个 qualifier。那么什么时候能够获取到值呢?本文 1.4 小节的情况可以获取到值,如:A 类有一个 B 属性,B 属性上有一个 @MyQualifier 注解,那么这里就会尝试去 RootBeanDefinition 中也找到一个该注解,其实就是去看 XML 中是否有配置,XML 如果有配置,则直接进入第 8 步。
  3. 当然,对于 1.4 小节这种案例启示我们日常开发中很少写,所以一般情况下,经过第 2 步之后,qualifier 变量还是为 null。那么接下来就调用 getQualifiedElementAnnotation 方法去查找注解。这个方法松哥感觉也是一个特别冷门的用法。该方法的本质实际上去查找当前 Bean 的定义中,是否存在 qualifiedElement,如果存在,则直接读取 qualifiedElement 上的 @Qualifier 注解。松哥举一个简单例子,来给大家演示一下什么情况下,getQualifiedElementAnnotation 方法返回值不为 null。

A 类和 1.1 小节的案例一样,依然是通过 @Qualifier 注解去描述想要注入一个名为 b1 的 Bean,B 类如下:

1
2
3
4
@Qualifier("b1")
public class B {

}

然后在配置文件中加载:

1
2
3
4
5
6
7
AnnotationConfigApplicationContext ctx = new AnnotationConfigApplicationContext();
ctx.scan("org.javaboy.bean.p3");
RootBeanDefinition bd = new RootBeanDefinition();
bd.setBeanClass(B.class);
bd.setQualifiedElement(B.class);
ctx.registerBeanDefinition("b1", bd);
ctx.refresh();

大家看到,在这个配置文件中,我向 Spring 容器手动注册了一个 BeanDefinition,并为这个 BeanDefinition 设置了 QualifiedElement 属性。如此之后,在上面第 3 步的方法中,系统就会找到这个 QualifiedElement(即 B.class),然后读取出来该类上面的注解,如果读取到了,就直接进入到第 7 步。

回到主线,我们来继续看第 4 步。

  1. 一般来说,第 3 步这种写法也很少见,所以基本上都会进入到第 4 步,现在是执行 getFactoryMethodAnnotation 方法,这个方法就是去找到 JavaConfig 配置类中 b1() 方法上的 @Qualifier 注解,这种是比较常见的,一般在这一步,就可以拿到 targetAnnotation 了,获取到 targetAnnotation 之后继续执行第 步。
  2. 当然,第 4 步也有可能没有拿到 targetAnnotation,虽然这种情况比较少见,但是也和小伙伴们说一下,如果第 4 步没有获取到 targetAnnotation,那么接下来会调用 getResolvedDecoratedDefinition 方法获取到一个装饰之后的 BeanDefinition,然后继续获取从中获取 targetAnnotation。这里所谓的 DecoratedDefinition 其实就是一个 BeanDefinitionHolder,这个里边保存了一个 BeanDefinition,这种配置其实比较繁琐,一般我们很少用,给小伙伴们简单演示下,如下:
1
2
3
4
5
6
7
8
9
AnnotationConfigApplicationContext ctx = new AnnotationConfigApplicationContext();
RootBeanDefinition rbd = new RootBeanDefinition();
GenericBeanDefinition bd = new GenericBeanDefinition();
bd.setBeanClass(B.class);
rbd.setDecoratedDefinition(new BeanDefinitionHolder(bd, "b99"));
rbd.setBeanClass(B.class);
ctx.registerBeanDefinition("b99", rbd);
ctx.register(JavaConfig.class);
ctx.refresh();

这个日常开发中应该很少用,小伙伴们了解即可。

回到住下,我么继续来看第 6 步。

  1. 如果前面几步还是没有拿到 targetAnnotation,那么接下来就要去类上面查找,查看目标类上是否有 @Qualifier 注解了(如果我们在 B 类上添加了 @Qualifier 注解,就会在这里拿到),去类上面找注解的时候,分别先按照 bdHolder 中的名字找类型,按照类型找注解以及按照 db 类型找注解的方式去找。关于 targetAnnotation 的各种查找方式就上面这些,其实就是去找一下目标类上是否存在 @Qualifier 注解,存在的话,就拿到这个注解。
  2. 接下来,会有一个有意思的判断,即,如果找到了 targetAnnotation,并且 targetAnnotation 还等于参数传进来的 annotation,那么这不就是 1.2 小节的情况吗?找到的 targetAnnotation 是 JavaConfig 类中 Bean 方法上的注解,参数传进来的则是 A 类中 B 属性上的注解,这俩相同的话,那没错了,这个 Bean 就正是需要的。
  3. 如果前面几步都没能 return,那么接下来就把传入的参数 annotation 中的属性都提取出来,如果参数上没有任何属性,即相当于 A 类的 B 属性上,虽然有 @Qualifier 注解,但是只有该注解,没有任何属性,那么显然匹配不上,直接返回 false。
  4. 当第 8 步成功拿到传入参数的 annotation 属性之后,接下来就遍历这些属性,获取到属性的 key 是 attributeName 以及 value 是 expectedValue,如果在前面第 2 步中拿到了 qualifier,那么就从 qualifier 中获取对应的属性值进行比较;如果 qualifier 中没有获取到 value,则从 BeanDefinition 的属性去获取也可以,但是很显然这些一般都是没有值的,拿不到。
  5. 如果还没有拿到 actualValue,并且 attributeName 是 value,并且 expectedValue 是字符串类型,然后判断 bdHolder.matchesName 中是否包含 expectedValue,这个判断实质上就是查看 bdHolder 中定义的 Bean 名称、别名等,是否和 expectedValue 相等,本文 1.1 小节中的案例,将在这里被比对到然后 continue,这里之所以不急着直接 return,是担心后面还有其他属性不满足,如果后续其他属性都满足条件,那么直接在方法结尾处返回 true 即可。
  6. 如果前面还是没能返回,并且 qualifier 不为空,那么就尝试去获取传入注解的默认值,然后进行比较。

以上就是 checkQualifier 方法完整的比较流程。总结一下,其实就两步:

  • 先去找目标类上是否也存在 @Qualifier 注解,就是前面 7 步找 targetAnnotation 的过程,如果目标类上也存在该注解,直接做注解的比对即可,就不去管属性了。
  • 如果没有 targetAnnotation,即 @Qualifier 注解只出现在需求的一方(A 类属性上才有),那么就把这个唯一的 @Qualifier 注解的属性拿出来,分别跟 XML 配置、BeanDefinition 属性、BeanName 等做比较,如果比对上了,就返回 true。

checkQualifier 方法看完了,现在我们回到 checkQualifiers 方法中,如果 checkQualifier 返回 true,那么 checkMeta 就会为 false,这个表示是否检查元注解,即如果 checkQualifier 比对失败,就会遍历当前注解的元注解,找到 @Qualifier,然后继续调用 checkQualifier 方法进行比较,后续逻辑和前面基本一致,我就不赘述了。

好了,经过上面一整套流程后,findAutowireCandidates 方法所返回的 matchingBeans 就只有一个目标 Bean 了~

3. 小结

今天和小伙伴们梳理了一下 @Qualifier 注解的作用,老实说,松哥在源码分析的过程中,也 GET 到 Spring 许多新的玩法,感兴趣的小伙伴赶紧去试试吧~

# Spring

喜欢这篇文章吗?扫码关注公众号【江南一点雨】【江南一点雨】专注于 SPRING BOOT+微服务以及前后端分离技术,每天推送原创技术干货,关注后回复 JAVA,领取松哥为你精心准备的 JAVA 干货!

评论

Your browser is out-of-date!

Update your browser to view this website correctly. Update my browser now

×