松哥手把手带你捋一遍 Spring Security 登录流程
为什么想和大家捋一捋 Spring Security 登录流程呢?这是因为之前小伙伴们的一个提问:如何在 Spring Security 中动态修改用户信息?
如果你搞清楚了 Spring Security 登录流程,这其实不是问题。但是在很多新手小伙伴多次询问之后,松哥还是决定来和大家仔细捋一捋这个问题。
我们先来大致描述一下问题场景:
你在服务端的安全管理使用了 Spring Security,用户登录成功之后,Spring Security 帮你把用户信息保存在 Session 里,但是具体保存在哪里,要是不深究你可能就不知道, 这带来了一个问题,如果用户在前端操作修改了当前用户信息,在不重新登录的情况下,如何获取到最新的用户信息?这就是松哥今天要和搭建介绍的问题。
1.无处不在的 Authentication
玩过 Spring Security 的小伙伴都知道,在 Spring Security 中有一个非常重要的对象叫做 Authentication,我们可以在任何地方注入 Authentication 进而获取到当前登录用户信息,Authentication 本身是一个接口,它有很多实现类:
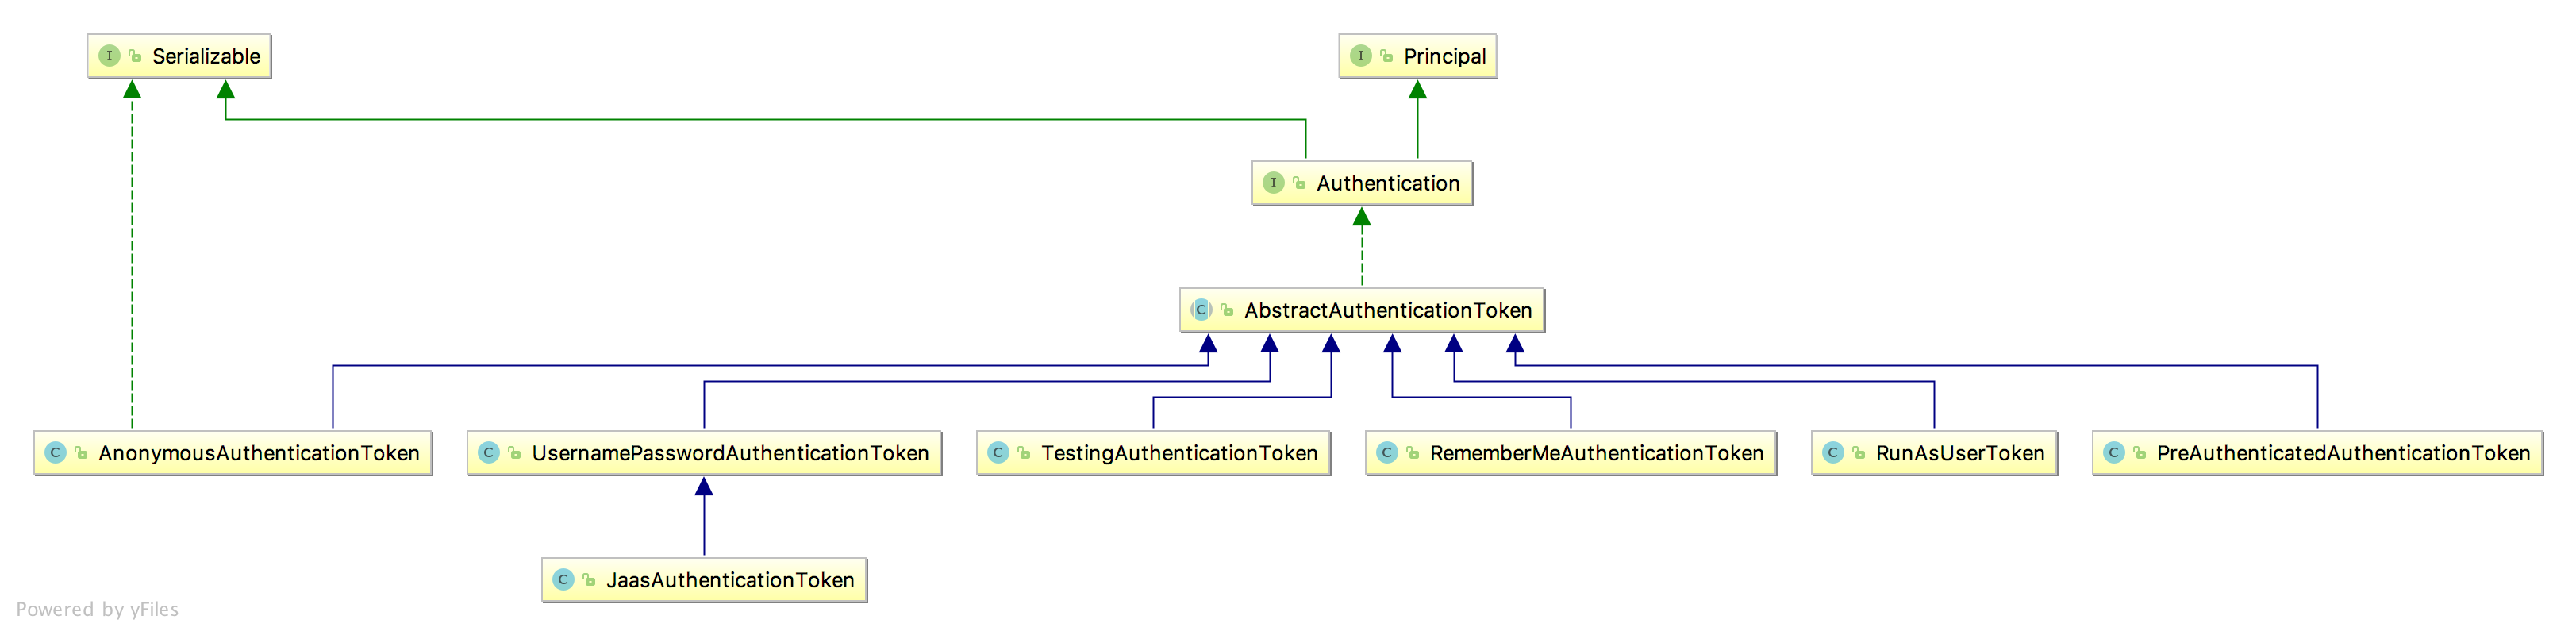
在这众多的实现类中,我们最常用的就是 UsernamePasswordAuthenticationToken 了,但是当我们打开这个类的源码后,却发现这个类平平无奇,他只有两个属性、两个构造方法以及若干个 get/set 方法;当然,他还有更多属性在它的父类上。
但是从它仅有的这两个属性中,我们也能大致看出,这个类就保存了我们登录用户的基本信息。那么我们的登录信息是如何存到这两个对象中的?这就要来梳理一下登录流程了。
2.登录流程
在 Spring Security 中,认证与授权的相关校验都是在一系列的过滤器链中完成的,在这一系列的过滤器链中,和认证相关的过滤器就是 UsernamePasswordAuthenticationFilter,篇幅问题,我这里列出来该类中几个重要方法:
1 | public class UsernamePasswordAuthenticationFilter extends |
根据这段源码我们可以看出:
- 首先通过 obtainUsername 和 obtainPassword 方法提取出请求里边的用户名/密码出来,提取方式就是 request.getParameter ,这也是为什么 Spring Security 中默认的表单登录要通过 key/value 的形式传递参数,而不能传递 JSON 参数,如果像传递 JSON 参数,修改这里的逻辑即可。
- 获取到请求里传递来的用户名/密码之后,接下来就构造一个 UsernamePasswordAuthenticationToken 对象,传入 username 和 password,username 对应了 UsernamePasswordAuthenticationToken 中的 principal 属性,而 password 则对应了它的 credentials 属性。
- 接下来 setDetails 方法给 details 属性赋值,UsernamePasswordAuthenticationToken 本身是没有 details 属性的,这个属性在它的父类 AbstractAuthenticationToken 中。details 是一个对象,这个对象里边放的是 WebAuthenticationDetails 实例,该实例主要描述了两个信息,请求的 remoteAddress 以及请求的 sessionId。
- 最后一步,就是调用 authenticate 方法去做校验了。
好了,从这段源码中,大家可以看出来请求的各种信息基本上都找到了自己的位置,找到了位置,这就方便我们未来去获取了。
接下来我们再来看请求的具体校验操作。
在前面的 attemptAuthentication 方法中,该方法的最后一步开始做校验,校验操作首先要获取到一个 AuthenticationManager,这里拿到的是 ProviderManager ,所以接下来我们就进入到 ProviderManager 的 authenticate 方法中,当然这个方法也比较长,我这里仅仅摘列出来几个重要的地方:
1 | public Authentication authenticate(Authentication authentication) |
这个方法就比较魔幻了,因为几乎关于认证的重要逻辑都将在这里完成:
- 首先获取 authentication 的 Class,判断当前 provider 是否支持该 authentication。
- 如果支持,则调用 provider 的 authenticate 方法开始做校验,校验完成后,会返回一个新的 Authentication。一会来和大家捋这个方法的具体逻辑。
- 这里的 provider 可能有多个,如果 provider 的 authenticate 方法没能正常返回一个 Authentication,则调用 provider 的 parent 的 authenticate 方法继续校验。
- copyDetails 方法则用来把旧的 Token 的 details 属性拷贝到新的 Token 中来。
- 接下来会调用 eraseCredentials 方法擦除凭证信息,也就是你的密码,这个擦除方法比较简单,就是将 Token 中的 credentials 属性置空。
- 最后通过 publishAuthenticationSuccess 方法将登录成功的事件广播出去。
大致的流程,就是上面这样,在 for 循环中,第一次拿到的 provider 是一个 AnonymousAuthenticationProvider,这个 provider 压根就不支持 UsernamePasswordAuthenticationToken,也就是会直接在 provider.supports 方法中返回 false,结束 for 循环,然后会进入到下一个 if 中,直接调用 parent 的 authenticate 方法进行校验。
而 parent 就是 ProviderManager,所以会再次回到这个 authenticate 方法中。再次回到 authenticate 方法中,provider 也变成了 DaoAuthenticationProvider,这个 provider 是支持 UsernamePasswordAuthenticationToken 的,所以会顺利进入到该类的 authenticate 方法去执行,而 DaoAuthenticationProvider 继承自 AbstractUserDetailsAuthenticationProvider 并且没有重写 authenticate 方法,所以 我们最终来到 AbstractUserDetailsAuthenticationProvider#authenticate 方法中:
1 | public Authentication authenticate(Authentication authentication) |
这里的逻辑就比较简单了:
- 首先从 Authentication 提取出登录用户名。
- 然后通过拿着 username 去调用 retrieveUser 方法去获取当前用户对象,这一步会调用我们自己在登录时候的写的 loadUserByUsername 方法,所以这里返回的 user 其实就是你的登录对象,可以参考微人事的 org/javaboy/vhr/service/HrService.java#L34。
- 接下来调用 preAuthenticationChecks.check 方法去检验 user 中的各个账户状态属性是否正常,例如账户是否被禁用、账户是否被锁定、账户是否过期等等。
- additionalAuthenticationChecks 方法则是做密码比对的,好多小伙伴好奇 Spring Security 的密码加密之后,是如何进行比较的,看这里就懂了,因为比较的逻辑很简单,我这里就不贴代码出来了。
- 最后在 postAuthenticationChecks.check 方法中检查密码是否过期。
- 接下来有一个 forcePrincipalAsString 属性,这个是是否强制将 Authentication 中的 principal 属性设置为字符串,这个属性我们一开始在 UsernamePasswordAuthenticationFilter 类中其实就是设置为字符串的(即 username),但是默认情况下,当用户登录成功之后, 这个属性的值就变成当前用户这个对象了。之所以会这样,就是因为 forcePrincipalAsString 默认为 false,不过这块其实不用改,就用 false,这样在后期获取当前用户信息的时候反而方便很多。
- 最后,通过 createSuccessAuthentication 方法构建一个新的 UsernamePasswordAuthenticationToken。
好了,那么登录的校验流程现在就基本和大家捋了一遍了。那么接下来还有一个问题,登录的用户信息我们去哪里查找?
3.用户信息保存
要去找登录的用户信息,我们得先来解决一个问题,就是上面我们说了这么多,这一切是从哪里开始被触发的?
我们来到 UsernamePasswordAuthenticationFilter 的父类 AbstractAuthenticationProcessingFilter 中,这个类我们经常会见到,因为很多时候当我们想要在 Spring Security 自定义一个登录验证码或者将登录参数改为 JSON 的时候,我们都需自定义过滤器继承自 AbstractAuthenticationProcessingFilter ,毫无疑问,UsernamePasswordAuthenticationFilter#attemptAuthentication 方法就是在 AbstractAuthenticationProcessingFilter 类的 doFilter 方法中被触发的:
1 | public void doFilter(ServletRequest req, ServletResponse res, FilterChain chain) |
从上面的代码中,我们可以看到,当 attemptAuthentication 方法被调用时,实际上就是触发了 UsernamePasswordAuthenticationFilter#attemptAuthentication 方法,当登录抛出异常的时候,unsuccessfulAuthentication 方法会被调用,而当登录成功的时候,successfulAuthentication 方法则会被调用,那我们就来看一看 successfulAuthentication 方法:
1 | protected void successfulAuthentication(HttpServletRequest request, |
在这里有一段很重要的代码,就是 SecurityContextHolder.getContext().setAuthentication(authResult); ,登录成功的用户信息被保存在这里,也就是说,在任何地方,如果我们想获取用户登录信息,都可以从 SecurityContextHolder.getContext() 中获取到,想修改,也可以在这里修改。
最后大家还看到有一个 successHandler.onAuthenticationSuccess,这就是我们在 SecurityConfig 中配置登录成功回调方法,就是在这里被触发的,这块大家也可以参考微人事里边的配置 org/javaboy/vhr/config/SecurityConfig。
真相大白!
4.视频讲解
最后,松哥也录了一个简单的视频教程,来和大家捋一捋:
并且基于这个知识点,我给微人事添加了一个个人中心的功能,一起来看下:
好了,不知道小伙伴们有没有学会呢?