[TOC]
平时我们项目中涉及到 AOP,基本上就是声明式配置一下就行了,无论是基于 XML 的配置还是基于 Java 代码的配置,都是简单配置即可使用。声明式配置有一个好处就是对源代码的侵入小甚至是零侵入。不过今天松哥要和小伙伴们聊一聊编程式的 AOP,为什么要聊这个话题呢?因为在 Spring 源码中,底层就是通过这种方式创建代理对象的,所以如果自己会通过编程式的方式进行 AOP 开发,那么在看 Spring 中相关源码的时候,就会很好理解了。
如果小伙伴们对 AOP 的基本用法还不熟悉,可以在公众号【江南一点雨】后台回复 ssm,有松哥录制的免费入门视频。
1. 基本用法 1.1 基于 JDK 的 AOP 我们先来看基于 JDK 动态代理的 AOP。
假设我有如下一个计算器接口:
1
2
3
4
5
public interface ICalculator { void add (int a, int b) ; int minus (int a, int b) ; }
然后给这个接口提供一个实现类:
1
2
3
4
5
6
7
8
9
10
11
public class CalculatorImpl implements ICalculator { @Override public void add (int a, int b) { System.out.println(a + "+" + b + "=" + (a + b)); } @Override public int minus (int a, int b) { return a - b; } }
现在假设我要生成一个代理对象,利用编程式的方式,代码如下:
1
2
3
4
5
6
7
8
9
10
11
12
13
14
15
16
ProxyFactory proxyFactory = new ProxyFactory ();proxyFactory.setTarget(new CalculatorImpl ()); proxyFactory.addInterface(ICalculator.class); proxyFactory.addAdvice(new MethodInterceptor () { @Override public Object invoke (MethodInvocation invocation) throws Throwable { Method method = invocation.getMethod(); String name = method.getName(); System.out.println(name+" 方法开始执行了。。。" ); Object proceed = invocation.proceed(); System.out.println(name+" 方法执行结束了。。。" ); return proceed; } }); ICalculator calculator = (ICalculator) proxyFactory.getProxy();calculator.add(3 , 4 );
这里几个方法应该都好理解:
setTarget 方法是设置真正的代理对象。这个在我们之前的 @Lazy 注解为啥就能破解死循环? 一文中大家已经接触过了。
addInterface,基于 JDK 的动态代理是需要有接口的,这个方法就是设置代理对象的接口。
addAdvice 方法就是添加增强/通知。
最后通过 getProxy 方法获取到一个代理对象然后去执行。
最终打印结果如下:
1.2 基于 CGLIB 的 AOP 如果被代理的对象没有接口,那么可以通过基于 CGLIB 的动态代理来生成代理对象。
假设我有如下类:
1
2
3
4
5
6
public class UserService { public void hello () { System.out.println("hello javaboy" ); } }
要给这个类生成代理对象,如下:
1
2
3
4
5
6
7
8
9
10
11
12
13
14
ProxyFactory proxyFactory = new ProxyFactory ();proxyFactory.setTarget(new UserService ()); proxyFactory.addAdvice(new MethodInterceptor () { @Override public Object invoke (MethodInvocation invocation) throws Throwable { String name = invocation.getMethod().getName(); System.out.println(name+" 方法开始执行了。。。" ); Object proceed = invocation.proceed(); System.out.println(name+" 方法执行结束了。。。" ); return proceed; } }); UserService us = (UserService) proxyFactory.getProxy();us.hello();
其实道理很简单,没有接口就不设置接口就行了。
1.3 源码分析 在上面生成代理对象的 getProxy 方法中,最终会执行到 createAopProxy 方法,在该方法中会根据是否有接口来决定是使用 JDK 动态代理还是 CGLIB 动态代理:
1
2
3
4
5
6
7
8
9
10
11
12
13
@Override public AopProxy createAopProxy (AdvisedSupport config) throws AopConfigException { if (config.isOptimize() || config.isProxyTargetClass() || hasNoUserSuppliedProxyInterfaces(config)) { Class<?> targetClass = config.getTargetClass(); if (targetClass.isInterface() || Proxy.isProxyClass(targetClass) || ClassUtils.isLambdaClass(targetClass)) { return new JdkDynamicAopProxy (config); } return new ObjenesisCglibAopProxy (config); } else { return new JdkDynamicAopProxy (config); } }
从这段源码中可以看到,有接口就是 JDK 动态代理,没有接口则是 CGLIB 动态代理。不过在最上面有一个 if 判断,这个判断中有三个条件,分别来和小伙伴们说一下:
config.isOptimize()
这个方法是判断是否需要优化。因为传统上大家都认为 CGLIB 动态代理性能高于 JDK 动态代理,不过这些年 JDK 版本更新也是非常快,现在两者性能差异已经不大了。如果这个属性设置为 true,那么系统就会去判断是否有接口,有接口就 JDK 动态代理,否则就 CGLIB 动态代理。
如果需要设置该属性,可以通过如下代码设置:
1 proxyFactory.setOptimize(true );
config.isProxyTargetClass()
这个属性作用也是类似,我们平时在使用 AOP 的时候,有时候也会设置这个属性,这个属性如果设置为 true,则会进入到 if 分支中,但是 if 分支中的 if 则不宜满足,所以一般情况下,如果这个属性设置为 true,就意味着无论是否有接口,都使用 CGLIB 动态代理。如果这个属性为 false,则有接口就使用 JDK 动态代理,没有接口就使用 CGLIB 动态代理。
hasNoUserSuppliedProxyInterfaces(config)
这个方法主要做两方面的判断:
当前代理对象如果没有接口,则直接返回 true。
当前代理对象有接口,但是接口是 SpringProxy,则返回 true。
返回 true 基本上就意味着要使用 CGLIB 动态代理了,返回 false 则意味着使用 JDK 动态代理。
如果是基于 JDK 的动态代理,那么最终调用的就是 JdkDynamicAopProxy#getProxy() 方法,如下:
1
2
3
4
5
6
7
8
9
10
11
@Override public Object getProxy () { return getProxy(ClassUtils.getDefaultClassLoader()); } @Override public Object getProxy (@Nullable ClassLoader classLoader) { if (logger.isTraceEnabled()) { logger.trace("Creating JDK dynamic proxy: " + this .advised.getTargetSource()); } return Proxy.newProxyInstance(classLoader, this .proxiedInterfaces, this ); }
Proxy.newProxyInstance 这就是 JDK 里边的动态代理了,这很好懂。
如果是基于 CGLIB 的动态代理,那么最终调用的就是 CglibAopProxy#getProxy() 方法,如下:
1
2
3
4
5
6
7
8
9
10
11
12
13
14
15
16
17
18
19
20
21
22
23
24
25
26
27
28
29
30
31
32
33
34
35
36
37
38
39
40
41
42
43
44
45
46
47
48
49
50
51
52
53
54
@Override public Object getProxy () { return buildProxy(null , false ); } private Object buildProxy (@Nullable ClassLoader classLoader, boolean classOnly) { try { Class<?> rootClass = this .advised.getTargetClass(); Assert.state(rootClass != null , "Target class must be available for creating a CGLIB proxy" ); Class<?> proxySuperClass = rootClass; if (rootClass.getName().contains(ClassUtils.CGLIB_CLASS_SEPARATOR)) { proxySuperClass = rootClass.getSuperclass(); Class<?>[] additionalInterfaces = rootClass.getInterfaces(); for (Class<?> additionalInterface : additionalInterfaces) { this .advised.addInterface(additionalInterface); } } validateClassIfNecessary(proxySuperClass, classLoader); Enhancer enhancer = createEnhancer(); if (classLoader != null ) { enhancer.setClassLoader(classLoader); if (classLoader instanceof SmartClassLoader smartClassLoader && smartClassLoader.isClassReloadable(proxySuperClass)) { enhancer.setUseCache(false ); } } enhancer.setSuperclass(proxySuperClass); enhancer.setInterfaces(AopProxyUtils.completeProxiedInterfaces(this .advised)); enhancer.setNamingPolicy(SpringNamingPolicy.INSTANCE); enhancer.setAttemptLoad(true ); enhancer.setStrategy(new ClassLoaderAwareGeneratorStrategy (classLoader)); Callback[] callbacks = getCallbacks(rootClass); Class<?>[] types = new Class <?>[callbacks.length]; for (int x = 0 ; x < types.length; x++) { types[x] = callbacks[x].getClass(); } enhancer.setCallbackFilter(new ProxyCallbackFilter ( this .advised.getConfigurationOnlyCopy(), this .fixedInterceptorMap, this .fixedInterceptorOffset)); enhancer.setCallbackTypes(types); return (classOnly ? createProxyClass(enhancer) : createProxyClassAndInstance(enhancer, callbacks)); } catch (CodeGenerationException | IllegalArgumentException ex) { throw new AopConfigException ("Could not generate CGLIB subclass of " + this .advised.getTargetClass() + ": Common causes of this problem include using a final class or a non-visible class" , ex); } catch (Throwable ex) { throw new AopConfigException ("Unexpected AOP exception" , ex); } }
关于直接使用 JDK 创建动态代理对象和直接使用 CGLIB 创建动态代理对象的代码我就不做过多介绍了,这些都是基本用法,松哥在之前录制的免费的 SSM 入门教程中都和小伙伴们讲过了,这里就不啰嗦了。
2. Advisor 2.1 Advisor Advisor = Pointcut+Advice。
前面的案例我们只是设置了 Advice,没有设置 Pointcut,这样最终拦截下来的是所有方法。
如果有需要,我们可以直接设置一个 Advisor,这样就可以指定需要拦截哪些方法了。
我们先来看一下 Advisor 的定义:
1
2
3
4
5
public interface Advisor { Advice EMPTY_ADVICE = new Advice () {}; Advice getAdvice () ; boolean isPerInstance () ; }
可以看到,这里主要的就是 getAdvice 方法,这个方法用来获取一个通知/增强。另外一个 isPerInstance 目前并没有使用,默认返回 true 即可。在具体实践中,我们更关注它的一个子类:
1
2
3
4
5
public interface PointcutAdvisor extends Advisor { Pointcut getPointcut () ; }
这个子类多了一个 getPointcut 方法,PointcutAdvisor 这个接口很好的诠释了 Advisor 的作用:Pointcut+Advice。
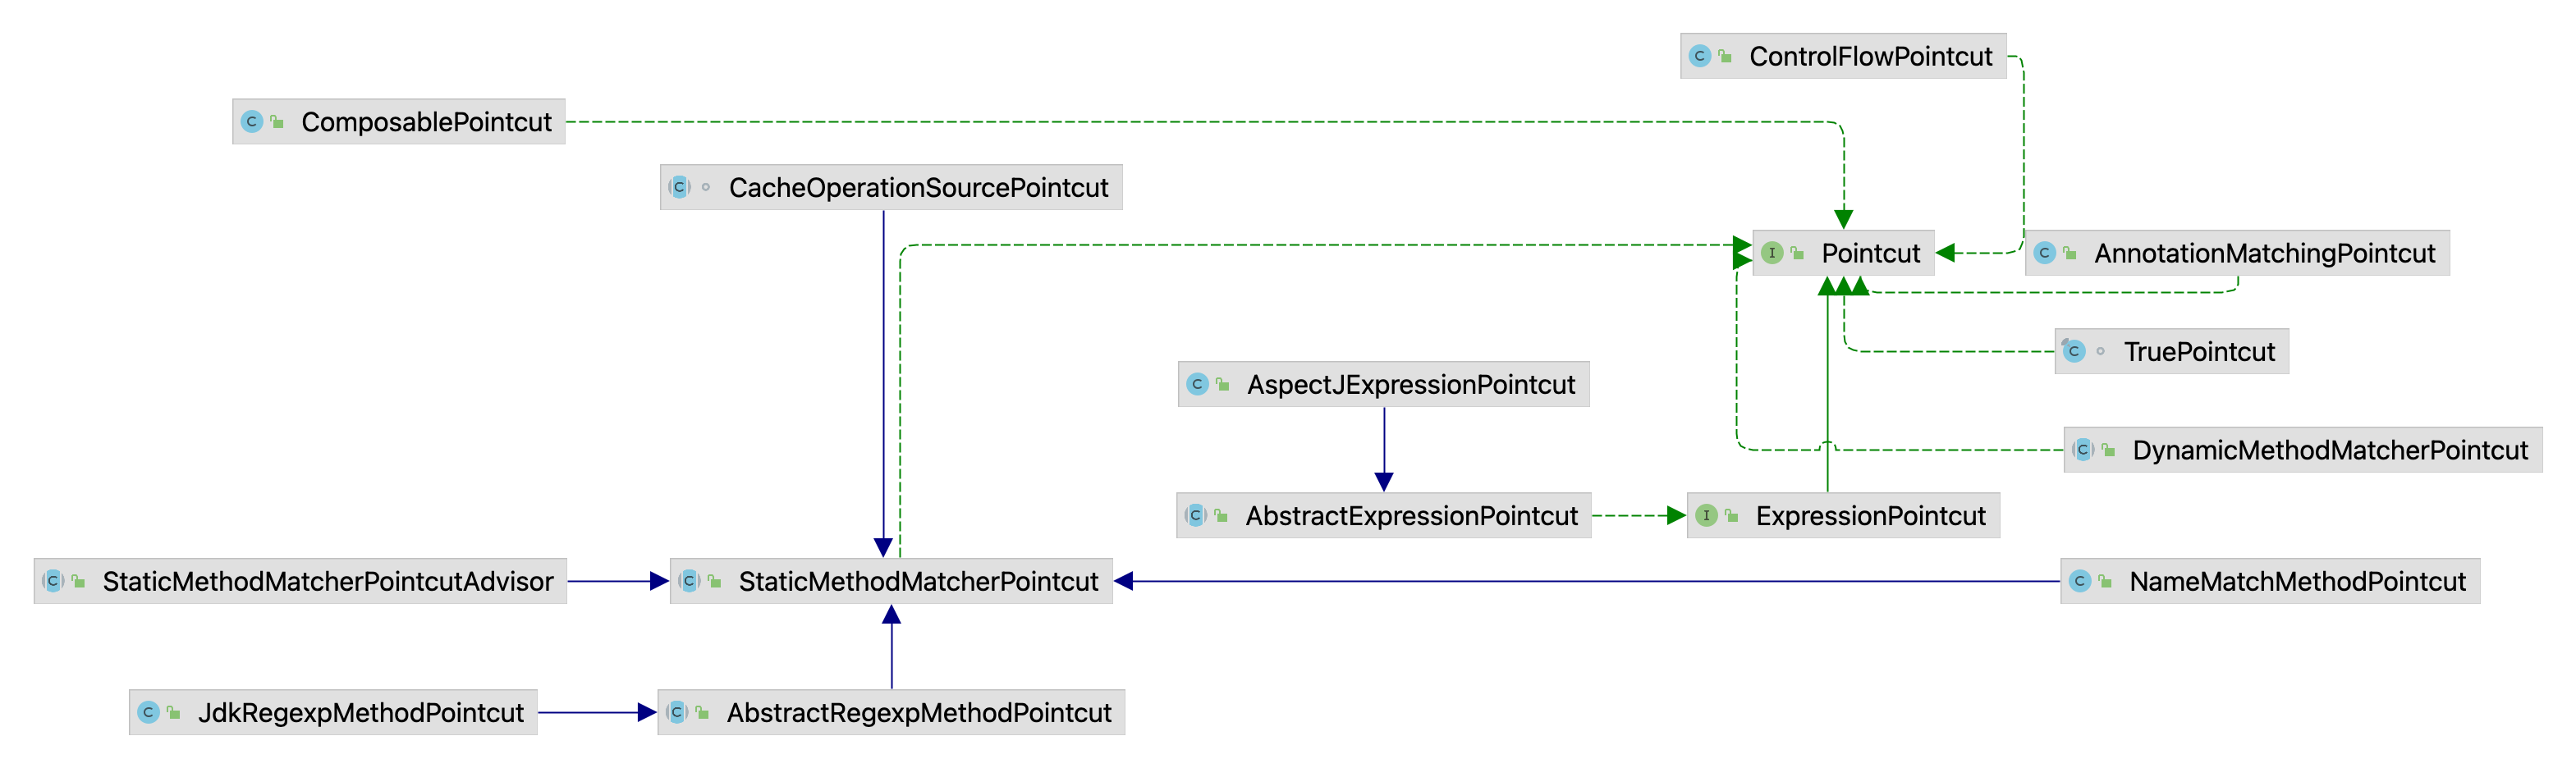
2.2 Pointcut Pointcut 又有众多的实现类:
挑两个有意思的说一下,其他的其实也都差不多。
2.2.1 Pointcut 首先我们先来看下这个接口:
1
2
3
4
5
public interface Pointcut { ClassFilter getClassFilter () ; MethodMatcher getMethodMatcher () ; Pointcut TRUE = TruePointcut.INSTANCE; }
接口里边有两个方法,看名字大概也能猜出来意思:
getClassFilter:这个是类的过滤器,通过这个可以刷选出来要拦截的类。
MethodMatcher:这个是方法过滤器,通过这个可以刷选出来需要拦截的方法。
至于 ClassFilter 本身其实就很好懂了:
1
2
3
4
5
@FunctionalInterface public interface ClassFilter { boolean matches (Class<?> clazz) ; ClassFilter TRUE = TrueClassFilter.INSTANCE; }
就一个 matches 方法,传入一个 Class 对象,然后执行比较即可,返回 true 就表示要拦截,返回 false 则表示不拦截。
MethodMatcher 也类似,如下:
1
2
3
4
5
6
public interface MethodMatcher { boolean matches (Method method, Class<?> targetClass) ; boolean isRuntime () ; boolean matches (Method method, Class<?> targetClass, Object... args) ; MethodMatcher TRUE = TrueMethodMatcher.INSTANCE; }
这里三个方法,两个是做匹配的 matches 方法,当 isRuntime 方法返回 true 的时候,才会执行第二个带 args 参数的 matches 方法。
举个简单的使用案例,假设我现在要拦截所有方法,那么我可以按照如下方式定义:
1
2
3
4
5
6
7
8
9
10
11
public class AllClassAndMethodPointcut implements Pointcut { @Override public ClassFilter getClassFilter () { return ClassFilter.TRUE; } @Override public MethodMatcher getMethodMatcher () { return MethodMatcher.TRUE; } }
这是自带的两个常量,表示拦截所有类和所有方法。
再假如,我要拦截 CalculatorImpl 类的 add 方法,那么我可以按照如下方式来定义:
1
2
3
4
5
6
7
8
9
10
11
12
13
14
15
16
17
18
public class ICalculatorAddPointcut implements Pointcut { @Override public ClassFilter getClassFilter () { return new ClassFilter () { @Override public boolean matches (Class<?> clazz) { return clazz.getName().equals("org.javaboy.bean.aop.CalculatorImpl" ); } }; } @Override public MethodMatcher getMethodMatcher () { NameMatchMethodPointcut matcher = new NameMatchMethodPointcut (); matcher.addMethodName("add" ); return matcher; } }
2.2.2 AspectJExpressionPointcut 我们平时写 AOP,比较常用的是通过表达式来定义切面,那么这里就可以使用 AspectJExpressionPointcut,这是一个类,所以可以不用继承新类,直接使用创建使用即可,如下:
1
2
AspectJExpressionPointcut pointcut = new AspectJExpressionPointcut ();pointcut.setExpression("execution(* org.javaboy.bean.aop.ICalculator.add(..))" );
如上切点就表示拦截 ICalculator 类中的 add 方法。
2.3 Advice 这个好说,就是增强/通知,在本文第 1.1、1.2 小节中均已演示过,不再赘述。
2.4 Advisor 实践 接下来松哥通过一个案例来和小伙伴们演示一下如何添加一个 Advisor:
1
2
3
4
5
6
7
8
9
10
11
12
13
14
15
16
17
18
19
20
21
22
23
24
25
26
27
28
29
30
31
32
ProxyFactory proxyFactory = new ProxyFactory ();proxyFactory.setTarget(new CalculatorImpl ()); proxyFactory.addInterface(ICalculator.class); proxyFactory.addAdvisor(new PointcutAdvisor () { @Override public Pointcut getPointcut () { AspectJExpressionPointcut pointcut = new AspectJExpressionPointcut (); pointcut.setExpression("execution(* org.javaboy.bean.aop.ICalculator.add(..))" ); return pointcut; } @Override public Advice getAdvice () { return new MethodInterceptor () { @Override public Object invoke (MethodInvocation invocation) throws Throwable { Method method = invocation.getMethod(); String name = method.getName(); System.out.println(name + " 方法开始执行了。。。" ); Object proceed = invocation.proceed(); System.out.println(name + " 方法执行结束了。。。" ); return proceed; } }; } @Override public boolean isPerInstance () { return true ; } }); ICalculator calculator = (ICalculator) proxyFactory.getProxy();calculator.add(3 , 4 ); calculator.minus(3 , 4 );
在 getPointcut 方法中,可以返回 3.2 小节中不同的切点,都是 OK 没有问题的。getAdvice 就是前面定义的通知。
其实在本文的 1.1、1.2 小节中,我们直接添加了 Advice 而没有配置 Advisor,我们自己添加的 Advice 在内部也是被自动转为了一个 Advisor,相关源码如下:
1
2
3
4
5
6
7
8
9
10
11
12
13
14
15
16
17
18
19
20
21
@Override public void addAdvice (Advice advice) throws AopConfigException { int pos = this .advisors.size(); addAdvice(pos, advice); } @Override public void addAdvice (int pos, Advice advice) throws AopConfigException { if (advice instanceof IntroductionInfo introductionInfo) { addAdvisor(pos, new DefaultIntroductionAdvisor (advice, introductionInfo)); } else if (advice instanceof DynamicIntroductionAdvice) { throw new AopConfigException ("DynamicIntroductionAdvice may only be added as part of IntroductionAdvisor" ); } else { addAdvisor(pos, new DefaultPointcutAdvisor (advice)); } }
小伙伴们看到,我们传入的 Advice 对象最终被转为一个 DefaultPointcutAdvisor 对象,然后调用了 addAdvisor 方法进行添加操作。
1
2
3
public DefaultPointcutAdvisor (Advice advice) { this (Pointcut.TRUE, advice); }
可以看到,在 DefaultPointcutAdvisor 初始化的时候,设置了 Pointcut.TRUE,也就是所有类的所有方法都会被拦截。也就是 Advice 最终都会被转为 Advisor。
3. 小结 好啦,这个就是编程式 AOP 的一个简单用法,这篇文章主要是希望小伙伴们对编程式 AOP 有一个简单的了解,这样在后续的 AOP 源码分析中才会更加轻松一些~